
Five FM27 formations compared by pressing lanes, role demands and tactical complexity, from 4-2-3-1 to a back three.
FM27 formations compared
A formation in FM27 is not a picture. It is a set of pressing lanes, passing options and defensive responsibilities, and the game scores how well your players can carry them. Two teams can line up 4-2-3-1 and play nothing alike, because one uses an inside forward and the other a winger, and because one presses from the halfway line and the other from its own box.
This page compares the five shapes worth knowing, by what they ask of a squad rather than by which one is fashionable.
4-2-3-1: the default
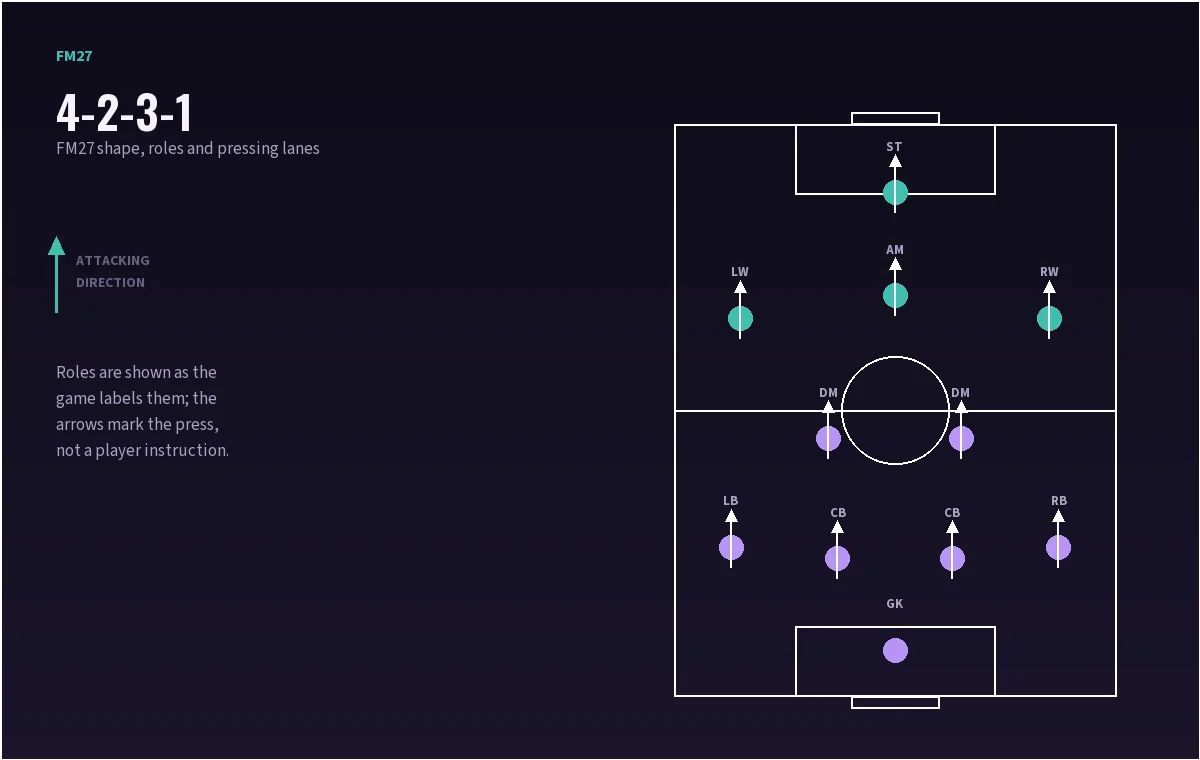
What it asks for. Two midfielders who can hold position, a number ten who can receive under pressure, and wide forwards who run in behind. The full-backs provide the width, so they need stamina.
Strengths. The double pivot protects the centre-backs, the ten links midfield and attack, and the shape can press or sit without changing personnel. It is the most forgiving formation for an average squad.
Weaknesses. The striker can be isolated if the ten is marked out of the game, and the space between full-back and centre-back is exposed when both full-backs push on.
Complexity cost. Medium. The role demands are specific but the instruction set can stay small.
Use it when you have a genuine number ten and two midfielders who can defend.
4-3-3: the pressing shape
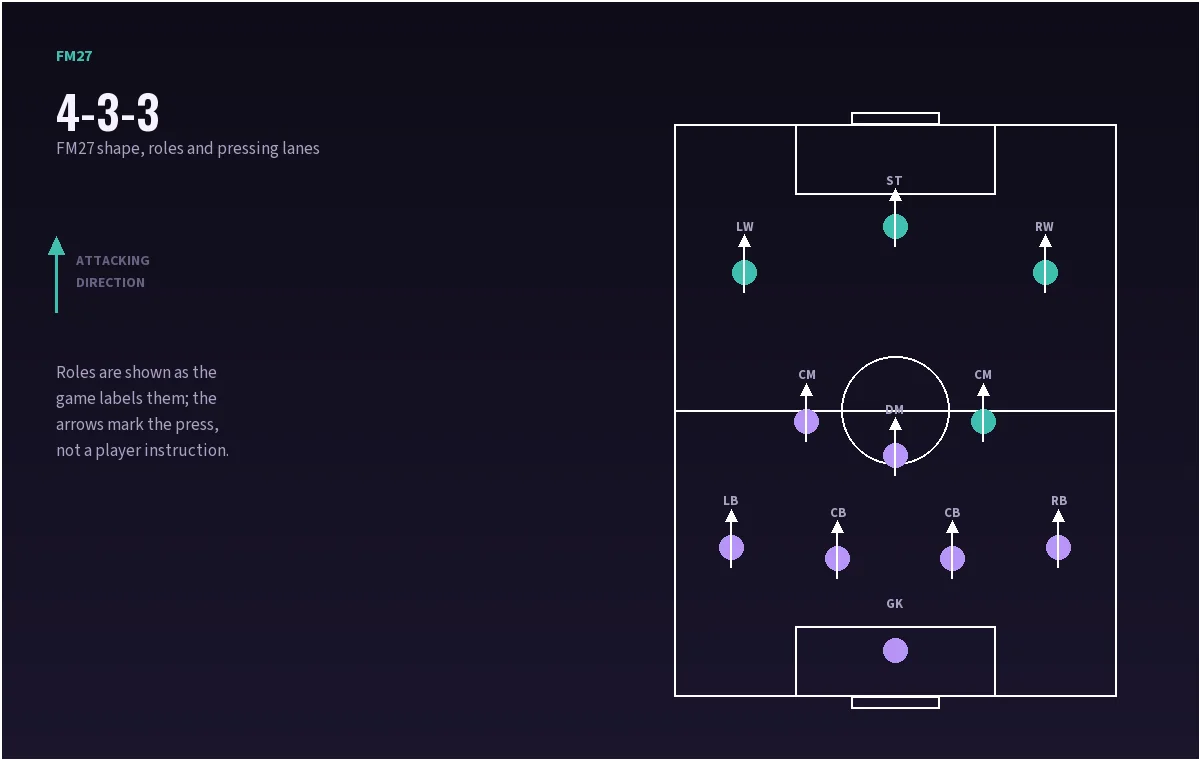
What it asks for. Three forwards who press in a line, a midfield three with one holder and two runners, and centre-backs fast enough to defend a high line.
Strengths. It compresses the pitch better than any other shape. The front three can press without leaving the midfield exposed, and the two eights arrive in the box late.
Weaknesses. It is the most expensive shape in conditioning and the most vulnerable to balls over the top. Without a pressing forward, the press has no trigger.
Complexity cost. High. A high line, a high press and three forwards with individual instructions add up.
Use it when you are the stronger team, or when your squad is young and deep enough to rotate.
3-4-2-1: the back-three counter
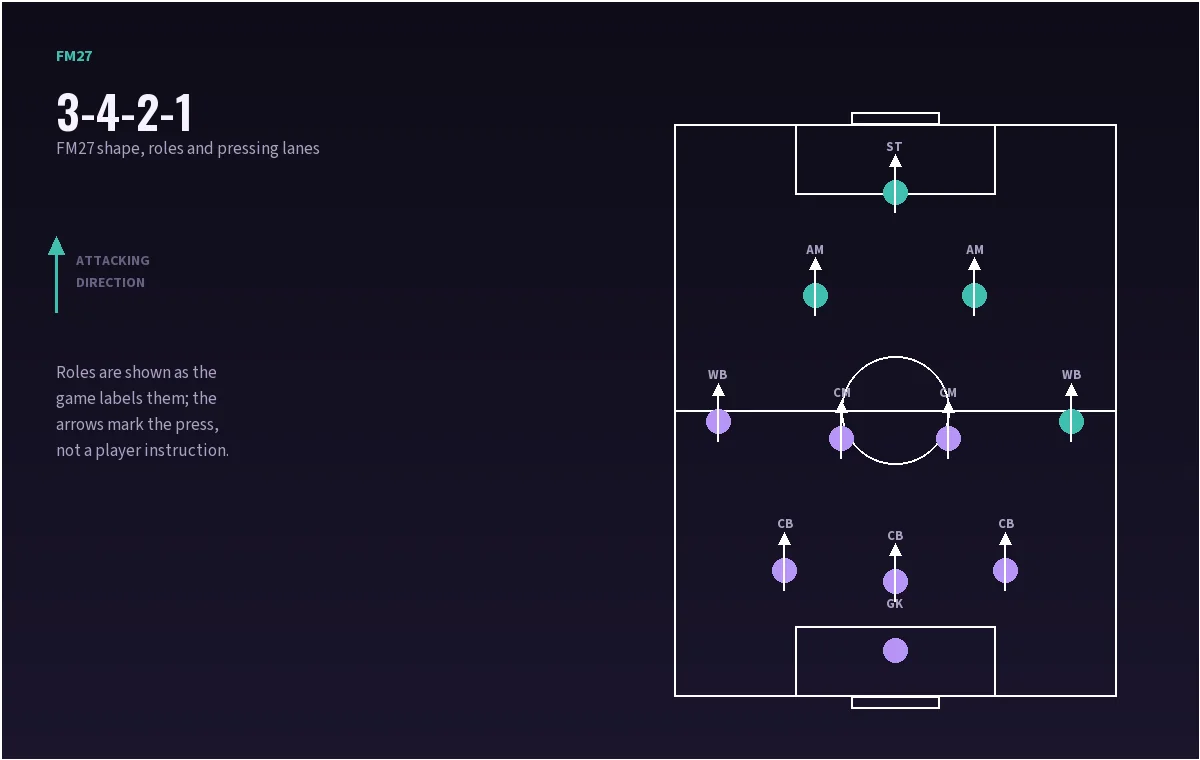
What it asks for. Three centre-backs, two wing-backs with engines, a holder, and two tens who can run both ways.
Strengths. Five defenders absorb crosses, the two tens counter through the middle, and the wing-backs provide width without leaving a back two. It is the best shape for a newly promoted or lower-league side that expects to defend.
Weaknesses. The wing-backs are asked to do two jobs, and the striker can be outnumbered if the tens are slow to join.
Complexity cost. Low to medium. The defensive shape is simple; the counter needs direct passing and fast forwards.
Use it when you are the underdog, or when your best players are centre-backs.
4-4-2: the direct shape
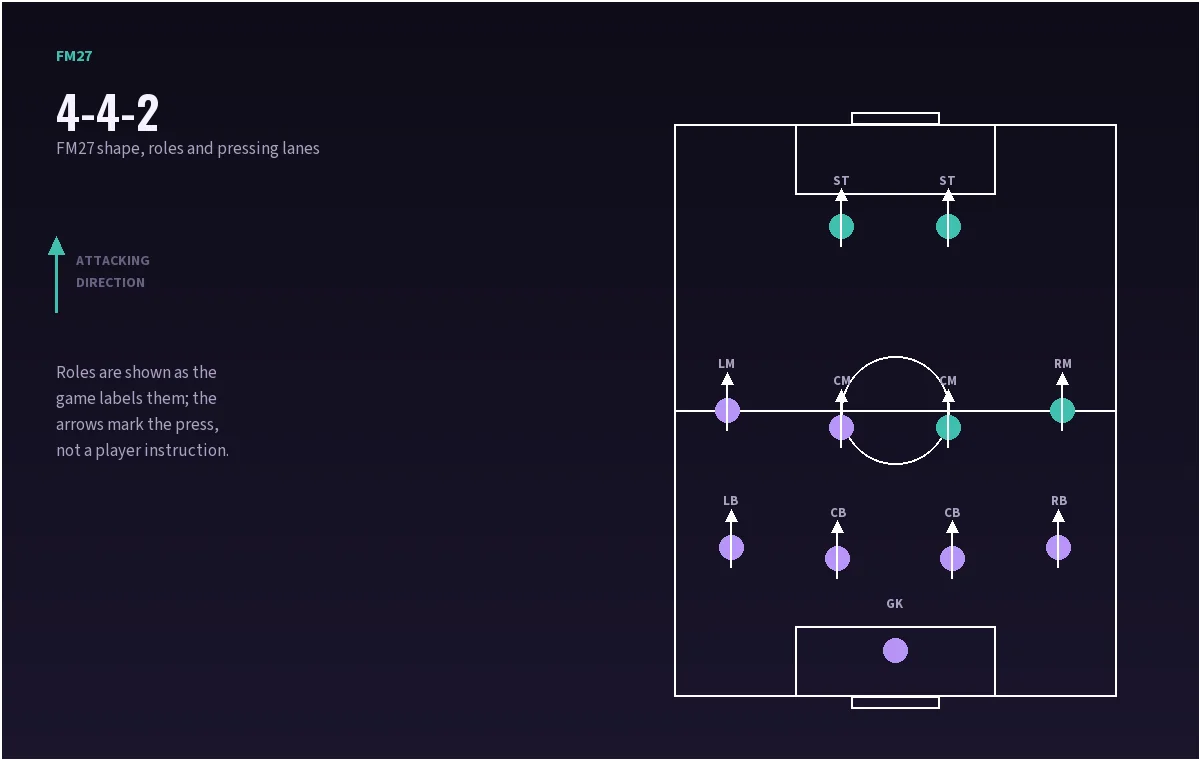
What it asks for. Two strikers who can hold the ball, two wide midfielders who track back, and a midfield pair that does not get overrun.
Strengths. Two strikers occupy both centre-backs, the wide midfielders protect the full-backs, and direct football reaches the front two quickly. It is cheap in complexity and works with limited players.
Weaknesses. The midfield two can be outnumbered by a 4-3-3, and the shape struggles to press high without leaving gaps.
Complexity cost. Low. It is the easiest shape to bed in at a lower-league club.
Use it when you have two strikers and a squad that cannot pass through a press.
4-1-4-1: the compact middle
What it asks for. A holder in front of the defence, four midfielders in a line, and a striker who can run the channels.
Strengths. It is the most compact shape without a back five. The line of four screens the full-backs, and the holder covers the space in front of the centre-backs.
Weaknesses. The striker is isolated, and the team can struggle to create without a number ten. It is a shape for denying space, not for chasing a game.
Complexity cost. Low. The instructions can be as simple as drop off, stay compact, counter.
Use it when you need a point away from home, or when your midfield is your strongest unit.
Comparing the shapes
| Formation | Press height | Complexity | Best for | Main risk |
|---|---|---|---|---|
| 4-2-3-1 | Medium | Medium | Balanced squads | Isolated striker |
| 4-3-3 | High | High | Strong, deep squads | Space behind the line |
| 3-4-2-1 | Low to medium | Low | Underdogs | Wing-back fatigue |
| 4-4-2 | Medium | Low | Direct, lower-league | Outnumbered midfield |
| 4-1-4-1 | Low | Low | Away games | No creativity |
Pressing lanes, not positions
The match engine cares about where your players stand when the opponent has the ball. That is why the same formation can press well or badly.
In a 4-2-3-1, the ten and the striker form the first line. If the ten does not press, the striker runs alone and the opponent plays through him. In a 4-3-3, the two eights join the front three, which is why the shape needs runners rather than playmakers. In a 3-4-2-1, the two tens are the press; the wing-backs stay in the line.
When you change formation mid-match, change the pressing instructions too. A 4-3-3 switched to a 4-4-2 without dropping the line will leave the same space behind the defence with one fewer midfielder covering it.
The effectiveness gauge reacts to familiarity. A shape the squad has not trained will score lower even if it is theoretically better. Train the alternative for a week before you use it in a match you need to win.
Formation and role fit
The formation is the frame; the roles decide whether it works.
- A 4-2-3-1 with two attacking full-backs needs a holder who can cover both flanks. A half-back is better than a defensive midfielder here.
- A 4-3-3 with a pressing forward needs wingers who tuck in, not touchline huggers, or the press has no central cover.
- A 3-4-2-1 with attacking wing-backs needs the wide centre-backs to step out, which requires pace.
- A 4-4-2 with a target forward needs one striker dropping in, or the midfield is bypassed entirely.
The best tactics page gives complete role and duty sets for the first three shapes.
Switching during a match
The most useful in-match switch is 4-2-3-1 to 4-3-3: move the ten into central midfield as a box-to-box runner, push the wingers higher, and raise the line. It adds a press without changing the back four.
The second is 4-3-3 to 4-1-4-1 when you are two goals up: drop the wingers into the line of four, keep the holder, and remove the counter-press. It costs you attacking threat and buys you compactness.
Do not switch to a back three mid-match unless you have trained it. The wing-back duties and the wide centre-back cover take longer to learn than the shape suggests.
What the formation does not fix
If your squad cannot defend transitions, no shape saves you. If your striker cannot finish, no formation creates chances for him. And if the effectiveness gauge is low because the players do not understand the instructions, changing the shape is treating a symptom.
Fix the role fit first, then the instructions, then the shape. The tactics guide sets out that order, and the Tactical Effectiveness page explains why the gauge moves.
Sources
More Football Manager 27 Guides
Manage in FM27's lower leagues: part-time contracts, free transfers, simple tactics, squad size and the promotion plan that survives League One.
Football Manager 27 costs £49.99, €59.99 or $59.99, with 10% off for pre-purchase. What the discount covers and what it does not.
Football Manager 27 releases on 10 November 2026. Here is how the global unlock works, when your region flips, and what opens earlier.
Set up FM27 scouting properly: assignments, scout attributes, recruitment focuses, report reading and the shortlist that finds wonderkids first.
FM27 corner routines, free-kick delivery and defensive set-piece setup, with a near-post routine you can build in five minutes.
Which FM27 staff attributes actually matter: coaching stars, workload, physios, set-piece coaches and the backroom hires that move the numbers.
Minimum and recommended FM27 PC specs, the laptop chips that qualify, Mac support and what to upgrade first if your machine struggles.
FM27 replaces tactical familiarity with a four-pillar effectiveness score. What moves the gauge, and why a complex tactic starts lower.